
What are those things in the title? Brake fluid is categorized as one of those three ratings. Most brake fluid that comes in a new car will be rated DOT 3. A few will Use DOT 4, and very few will ever use DOT 5 which is a silicone based product.
If you want to look at brake fluids from a chemical standpoint DOT 3 fluids are based on glycol and glycol esters. DOT 4 fluids are much like DOT 3 fluids, but also contain borate esters. There is another rating called DOT 5.1 that consists of borate esters.
Let’s look at what brake fluid’s (and clutch fluid) real job is. Brake fluid is used to transmit pressure from the brake pedal to the extreme ends where the disk brake calipers or drum brake cylinders are. This pressure is then applied to the pads (or shoes) against the rotation of the brake rotor (or drum). It is this property not to compress that allows it to do its job well.

Back to the chemistry. Notice that water is not listed as a component of brake fluid. Water boils (sea level air pressure) at 212 degrees F (100 C). Since the disk rotor can and will generate over 1000 degrees (F) of heat and transfer 400 degrees or more to the caliper water is not a good fluid to choose.
Why do I mention water? The chemistry of DOT3 and DOT 4 brake fluids attract water. Right out of the air. In fact the anti-freeze you use is probably glycol based just because it mixes well with water.
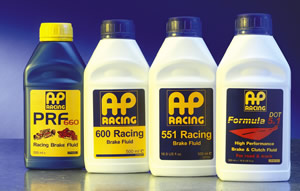
The difference between the DOT (Department of Transportaion) ratings of brake fluid are the boiling point ranges that they achieve both dry (no water absorbed) and wet (about 3-4% water content). For DOT 3 the dry boiling point is at least 401 and the wet 284 degrees. DOT 4 raises the bar to 446 and 311 respectively. Those are the DOT ratings mind you , and there are high performance brake fluids that exceed those ratings.
The cost of brake fluid can vary as well from less than $0.20 an ounce to over $2.00 an ounce. Some of the high performance fluids are rated well over 500 (to almost 600) degrees boiling point dry. Wet boiling points will also vary, but be well over 400 degrees.
The higher boiling points are critical to those of you that wish to spend time on a race track. Once you boil your brake fluid it will not recover and you MUST bleed and change out the fluid.
The every day driver will find brake performance just fine by sticking with the fluid that the dealership recommends unless they use their vehicle to the extreme, such as a newspaper delivery route or negotiating their way down curvy mountain roads. You will know because the brake pedal will start to feel mushy as the fluid overheats and the pedal may even go to the floor.
So what is the big deal? The big deal is that most of us never flush and replace our brake fluid. In fact, if you go to a garage and have a “brake job” done it is highly unlikely that they will do much more than bleed the brake lines. This means that the old – water soaked – tired – brake fluid will still be there. The water can react to oxidize brake components from the inside out. What you should do, probably once a year, is have the old fluid flushed and completely replaced with fresh brake fluid.
Bleeding Methods
If your mechanic does it the right way they will use a vacuum bleeding system. The first thing they will do is remove all the wheels so they can get to the brake bleed screws. Then they will vacuum out the brake fluid reservoir of old fluid. Then the technician will ensure that new fluid is always kept in the brake fluid reservoir and pull it through the system starting at the brake bleeder farthest from the master cylinder. Vacuum bleeding is preferred since pressure bleeding actually introduces and dissolves air into the new fluid. This will gas out as the new fluid is heated and the pedal will get spongy again.
If you do your own brake bleeding and don’t have access to a vacuum bleeder you can take longer and bleed it in the traditional fashion of using the brake pedal to push out fluid and air. The approach is similar. Loosen the lug nuts, get the car up in the air on jack stands (if you DON’T know how to do this safely, DON’T do it yourself), and take off all the wheels. Prepare yourself with some clear tubing and catch cans for the old fluid. I take used pint sized plastic milk containers and suspend them with bent coat hanger from the caliper or brake drum. The milk containers are nice because you can use the hollow handle to push the tubing into where it will be held on one end while the other end will go over the bleeder screw (valve). Use a box end wrench of the appropriate size to open and close the bleeder screw. You will need someone who follows directions well to sit in the car and use the brake pedal. Don’t let them take their foot off the brake pedal unless the valve is closed.
The goal will be to get the new fluid all the way to the farthest points in the system so the rear brakes will take the longest to flush. A company called Ate makes a blue colored fluid that makes it easy to tell that you have accomplished that.
Unless your factory manual specifies something different you start with the right (passenger side) rear, then move to the left (drivers side) rear, then the right front, and finally the left front. If you have ABS you may need to either leave the engine running or short out a test connector to ensure the ABS pump cycles while bleeding. This last part (ABS) will depend on you doing research on YOUR particular vehicle.
As you cycle from each corner you will have to work in concert with your buddy at the brake pedal. The goal is not to get any air introduced into the system while you bleed it. To prevent air from entering you need to keep the reservoir from going empty. So check it often and add new fluid as needed.
You should also remove as much of the old fluid from the reservoir before you add new fluid to the reservior. A turkey baster or similar device will allow you to do that. Just have spray “brake clean” ready in case any fluid get on painted surfaces. If left on paint it will remove it. PROTECT YOUR EYES.
The routine for bleeding as a team goes like this. The person in the car on the brake pedal needs to pay attention to your instructions so that they won’t lift their foot off the pedal if you have the bleeder still open. The first thing you will ask them to do it pump the brake pedal about three times. This is to ensure that some pressure is in the line so that fluid (and any air, water, etc.) will come out of the bleeder when you open it. They shouldn’t pump the pedal like they are making a panic stop. Just a nice easy stroke will do the job. They don’t have to keep an enormous amount of pressure on the pedal either. Just enough to move it toward the floor is fine.
After they have pumped the pedal, they should let you know that they are “holding” pressure on the pedal. You should be at the bleeder screw with a wrench on it and a tube going to the catch bottle. You open the valve and close the valve and then let the person on the brake pedal know that they can lift their foot. If the foot comes off the pedal while the valve screw is open you will introduce air into the line – that is not your objective.
There is a product call Speed Bleeders that can be a huge help. It is a bleeder screw with a spring loaded check valve that prevents air from getting back into the system. I’ve seen them sold in auto parts stores, but I know that they are also available on line.

You will need to continue this until you get nice, clean, new fluid out to the particular brake you are working on and then repeat for the other three. Be sure to keep enough fluid in the reservoir to prevent air from entering the system from that end.
You CAN do this yourself if you take your time, get prepared prior to starting, and have someone who knows what they are doing to help you. Otherwise – find a professional that knows what they are doing.
Brake fluids gain contamination as they age and should be replace periodically. If you race you should change your brake fluid as often as you change your oil.

Leave a reply to Paul Cancel reply